
In my last post (So what is IoT Anyway) I quickly covered the fascinating world of Internet of Things (IoT), but this wouldn’t be a typical Dr.Duino post if I didn’t give you a concrete example of a project you, YES you can build this very weekend!
It’s a customer favorite and I think you’re going to be burning up with precipitation over it, AND NO you didn’t read that wrong… PRECIPITATION!
Hands down one of the most common projects that people want to build is a desktop, fully customizable, mini weather station just like you see below.

I call it the Mini Forecaster and it’s a 3D printable, fully custom, personal weather station which grabs YOUR local weather via the internet via an ESP32 IoT device!
Cool right?
But let’s dig in a bit and see how this all works.
First off, this is an insanely cheap build, less than $50 bucks in parts, in reality its even cheaper as the following parts are all that you need.

1- Dupont wires – for connecting the parts together.
2- OLED – Organic Light Emitting Diode – that’s the display that you see running inside the 3d printed box above.
3- ESP32 – This is the IoT device which connects up to the internet and polls for your local weather (more on that in a sec).
4- Addressable LED Stick – This is completely optional but makes the box look cool when it lights up.
All of these parts can be easily purchased from Amazon for around $30 bucks.
But now what do you do with it?
Enter… OpenWeatherMap.Org

If you’re not familiar with this site, it’s a completely free to use site which allows you to “poll” it for the weather anywhere on the planet!
But how do you talk to open weather map.org?
Via API of course! Short for Application Programming Interface.
Let’s take a look at the image below and break it down!
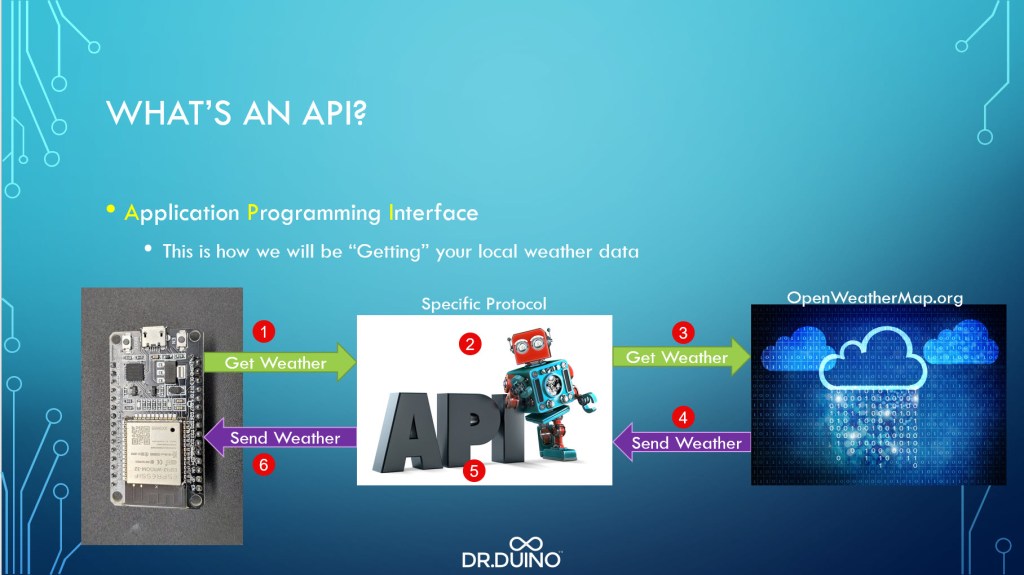
Think of an API like a very specific language, like English or Italian, or French, or, or , or…
Each language has a very specific way in which to use it.
For example, if I said “Hi, my name is Steve and I’m here to teach you about IoT”.
Well, that you understood perfectly right? That’s because I used the English language in a structure that you’re familiar with.
BUT!!! If I said, “Steve, Iot here my teach name Hi about”… well… that you might tilt you head like a pug and wonder what I just said.
The same is true with API’s, especially with open weather maps.
So long as you understand how communicate THROUGH their API, you’ll be deciphering the weather like Zeus himself!
But lets take a deeper look starting from the ESP (1) above.
In order to get the weather for your particular location, you need to feed the API with a few things:
Your custom API Key (which open weathermap.org provides you with for FREE), City, Country and Unit (metric or imperial).
Then with that info, you simply make a call to open weather maps API over Wifi (2 above).
From there, Open weather map (if your data is formulated correctly), will spit back to you the weather for whatever area you asked it for in what’s called JSON format (4&5 above).
We won’t have time to go into JSON in this post, but in short, think of it as like a letter with the weather you requested in a very specific format.
From there your ESP32 has to dig through that data (6 above) and translate it into human readable data that it will display on the OLED.
And bam, bingo bango, you have you’re very own, fully functional mini wireless weather station.
Now, I couldn’t just stop there, I wanted a cool desktop widget so I made it so that it has 6 distinct modes (all of which can be customized).
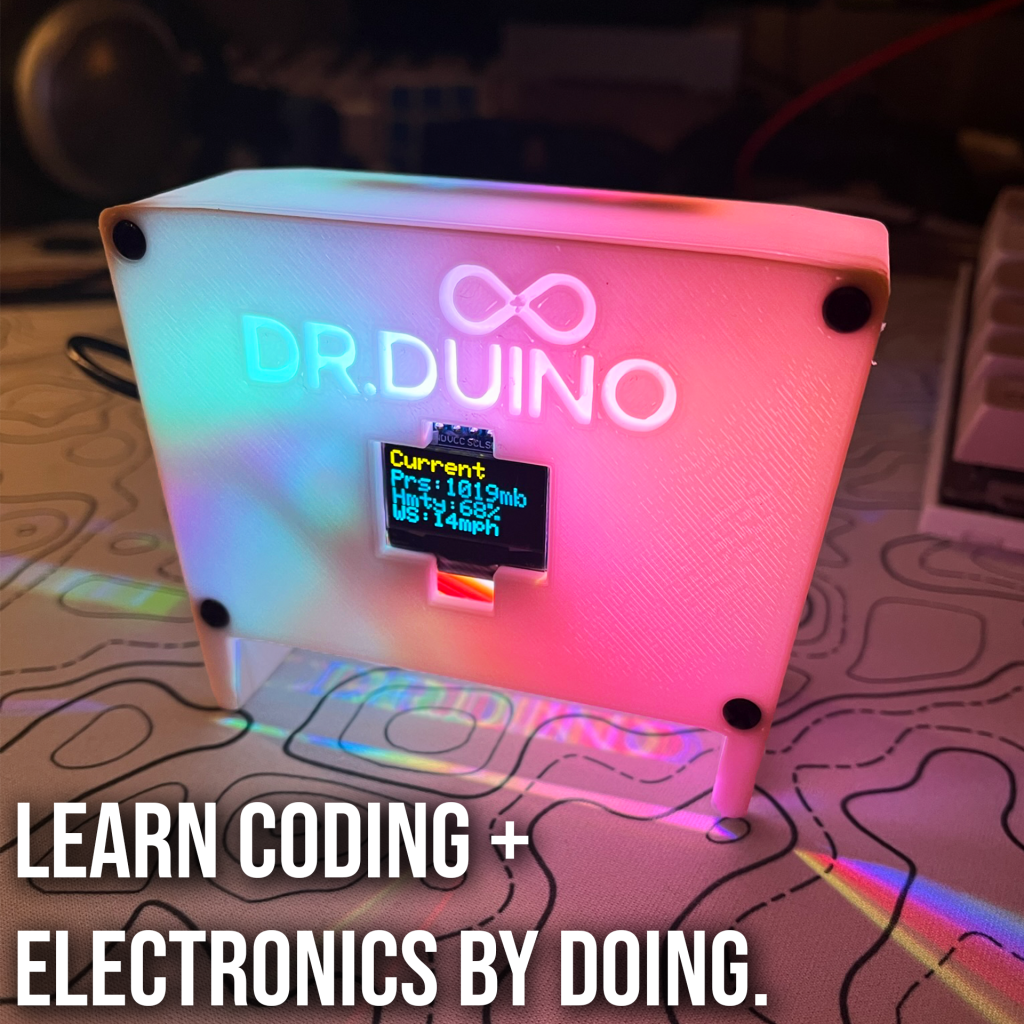
Mode 1 – Current weather (This is polled every 15 minutes).
Mode 2 – Future weather, this is the weather which is predicted for 12 hours in the future. (Yes this can be changed, but you need to do a lot more to handle it.)
Mode 3 – Advanced Statistics – This includes: Wind speed, barometric pressure and humidity.
Mode 4 – Atomic Clock Mode – This will show you the current date and time from your local NTP server.
Mode 5&6- Sunrise/Sunset Time – This gives you your local sun up and sun down times!
Well… that’s it, that’s what’s involved in making your very own Mini Wireless Weather station! Epic right?
Want to build your own? Well, then I’d like to personally invite you to check out Dr.Duino’s Maker Academy where this project (and many, many more) are just waiting for you to build them!
Think of the Academy like a binge-worthy library of projects THAT JUST WORK! No muss, no fuss, everything JUST WORKS!
I provide you with a complete parts list (everything from Amazon to make it easy), all the CODE (~1K lines), the 3D printable file (don’t worry if you don’t have a 3D printer, I give you options to get it) and SIMPLE, step-by-step directions anyone, of any skill level can follow!

It’s 100+ hours of binge worthy content which will take you from zero to Arduino/Iot super hero in no time flat.
From getting your computer setup to learning how to code in just 15 minutes per day to building your very own Wireless Weather Station and everything in between, I guarantee this is the very best way to dip your toe into Arduino/Iot!
So if you’re interested in finally getting started with electronics and coding then click the link below to start your 7 Day FREE trial of Dr.Duino’s Maker academy.
Oh and when you sign up for the premium, I’ll even send you an IoT E-Book ($50 Value) completely FREE!
